"A house comes with responsibilities, and a historic house comes with more responsibilities. We are only caretakers of these houses, which were here before we owned them and which will be here after we are gone." Jane Powell, author

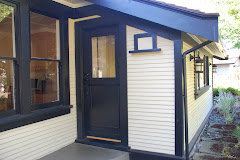
A classic bungalow is an aesthetic ensemble that marries exterior to interior, sometimes with considerable architectural flair, which is why after nearly a century we continue to covet them. Bungalows still have remarkable 'curb appeal', exuding a cozy, rustic charm that draws us up stone steps, onto welcoming verandahs and lures us inside through solid wood-and-glass doors. A host of striking features proclaim that this simple but 'exuberant' bungalow isn't just another suburban house, but a real home.
Bungalows beckon insistently with their mixture of attractive exterior details, which often include timbering, decorative braces, stone or brick piers, and high quality sash and casement windows (sometimes combined with leaded glass.) Bungalow designers skillfully varied these elements to effectively differentiate facades within a unified program. Conserving the original interplay of these details is an important goal for restoration - one that demands devilishly close attention.
A bungalow's wooden exterior typically requires ongoing maintenance. Even when it gets it, eventually it needs more comprehensive restoration. Weather abrades surfaces, paint fades, and at some point (especially in bungalows, like ours, that rest close to or right on the ground) moisture invades structure. All these forces are abetted by neglect.
Occupants also have impacts: a carelessly made hole in a wall to allow an unsightly cat door, an aluminum picture window in place of original casements, or out-of-scale sliding doors to the patio. All of these are inherited by the caring bungalow owner, who undertakes to address them during restoration.
The restorative urge is put it back to what it was, or at least to make it consistent with the original intent, so as to retain and express all the artful qualities its designers crammed into it. Getting that done satisfactorily takes a mix of curiosity and patience, and loads of highly skilled help. Sorting it out is a bit of minefield. Finding the right artisans is vital (your local heritage society should have a list). I find it helps to think of myself as the general contractor, the person responsible for devising the critical path to a good outcome, the one who learns enough about what's needed to oversee and guide the work at every stage.
In reality, restoration turns out to be a long road, fidelity to an original design an ongoing challenge. For the luckier ones, it may be mostly decorative: sanding, patching and repainting. But for many of us, especially those in wetter climates, it can involve major interventions in places where dampness has spawned decay. So it was back in the summer of 1998 at our Saanich bungalow, when we finally got around to tackling the exterior.

I watched with growing horror as the building's cladding came off in areas close to the ground, where moisture had seeped in. Highly skilled help is needed to achieve accurate reconstruction of scaled details, but also to take things apart carefully so as to minimize damage to the areas needing attention. As often as not, new components aren't available off-the-shelf and have to be made from scratch - it took real joinery skills to mill the siding and water table for our bungalow. This is expensive work, slow and painstaking. Yet all the extra effort is worth it when you finally see a renewed house that's true to its designer’s intentions.
I thought we’d finished our exterior restoration when the new shingle roof, wooden gutters, siding, water table and belt band went on and the building was finally repainted. A dramatic scheme in yellows and black spruced the old wood into a seamless harmony with the new. It was as though that cat door had never existed!
 We’d carefully replaced every piece of rotten wood our competent carpenter had detected, and we’d done it all to heritage standards. ‘Good for the next ninety years’ I said to myself with pride. ‘Now we can focus on the interior’.


That impression held for over a decade. Then in spring 2010, on one of my periodic close inspections, I noticed a slight sagging in a soffit board under one of the trio of massive gables fronting and defining our 1913 bungalow. Inspecting further, I noticed similar slumping at the outermost edge of the north gable end (above). (The soffit is the sealed underside of the eave of the roof, which projects out over the walls. For more see: Eaves/soffits )
I had a sinking feeling because this signaled rot in an enclosed space. Located where it was, it could mean a much bigger problem, affecting gutters, fascia, perhaps even the huge barge boards framing the defining gables. This wasn’t good news!

Typically bungalows don't develop this sort of problem, as the underside of the roof is left open and the visible rafters are treated artistically and turned into a characterizing feature. Exposed or expressed structure is the hallmark of Gustav Stickley's Craftsman design in furniture and buildings, which bungalow designers borrowed and interpreted. The picture above shows decorative treatment of rafter tails with the eavestroughs (or gutters) notched into them.

Enclosed soffits are more typical of the one-and-a-half storey vernacular Arts&Crafts houses built in Victoria in the first decades of the twentieth century (as above). If the original wood gutters stay damp and begin to rot, these encased, unvented soffits offer the perfect spot for it to grow.

For this quirky, eclectic 1913 bungalow, designer Hubert Savage opted for the more complicated, costly and formal look of enclosed soffits. A newcomer to Victoria and Canada from England, he was perhaps consciously incorporating a defining feature of the local Arts & Crafts house into his own bungalow (a comparative novelty at the time). However the choice was made, it led to a unique appearance - I've only located a couple of other bungalows in all of Victoria with enclosed soffits!

Wooden gutters were common in the Pacific Northwest at the turn of the century. In B.C. they were milled from the old-growth Douglas Fir that was abundant and cheap. They're long-lasting (50 - 100 years) if well maintained. But with their narrow drain channel and the two-inch galvanized downspouts they were paired with, they have a tendency to plug with debris and hold water. Two inches is the maximum width of downspout the narrow drain channel can accept, which is moderately dysfunctional but does look quite striking.
Wood gutters are integral to the period-feeling of a 1913 building, and for those who value fidelity to the original ‘look’, they’re mandatory. Aesthetically, they do impart a classier impression than the K-style aluminum gutters that are so temptingly cheap a replacement. Rectangular aluminum downspouts seem out-of-scale and not quite true-to-period when applied to older buildings. So we'd gone the extra steps and replaced ours with new wood and recycled the galvanized downspouts.
Wood gutters are integral to the period-feeling of a 1913 building, and for those who value fidelity to the original ‘look’, they’re mandatory. Aesthetically, they do impart a classier impression than the K-style aluminum gutters that are so temptingly cheap a replacement. Rectangular aluminum downspouts seem out-of-scale and not quite true-to-period when applied to older buildings. So we'd gone the extra steps and replaced ours with new wood and recycled the galvanized downspouts.
To tackle our emerging problems with rot I called upon Vern Krahn, a finishing carpenter and cabinet-maker who’d worked his magic on interior renovations here over the years. Vern is expert in all aspects of joinery, so can replicate any wooden component precisely. He quickly confirmed serious rot in the soffits, likely in contiguous areas of the guttering, and in back of the bargeboards – all masked by that fancy new paint job!

You don’t know exactly what you’re facing until you open things up. Only then does the full reality become clear. There’s something terrifying in seeing an integrated ensemble ripped open and the guts of structure exposed. It takes a big leap of faith to believe that it will all come back to its former glory one day.

Here rot had eaten slowly away at the wood for years, from the inside out. Once it was opened up, the extent of the damage was clear and shocking. Gutters, soffit, fascia and the top of the bargeboard all needed replacing. We agreed from the outset that the work would be done to 'museum quality' - a term Vern uses humorously to capture utmost precision in restoration.

Working at this height requires a platform, so scaffolding had to be erected between the building and a rocky outcrop. Even then, Vern is working in highly confined spaces with his arms above his head a lot of the time. Here he's levelling out the excavated area of a bargeboard with surgical precision, to prepare it for the fix.

New clear fir patches have been cut and are being glued into place on the bargeboard ends to replicate the original dimensions exactly.

These bargeboards are now restored to their original profiles - note the tiny riser blocks added to the topside. This detail gives the roof-end a little lift, imparting a slightly oriental feeling to the gables. An interior frame for the soffit has also been rebuilt.

The first of four such interventions is now completed, the replacement wood all primed, new shingles placed over the bargeboard ends. Vern managed to adapt stock clear-fir flooring for the boxed soffit by running a small groove into the joins to mimick the original wood (seamless restoration).We've taken the opportunity to add an outlet for a new light fixture under the soffit, to illuminate the front and side of the house at night.

Moving along the facade, the damage turns out to be even more extensive in the guttered areas between gables. Here Vern has reset the scaffolding and stripped out the rotten wood. We're waiting for Heritage Woodworks to mill more wooden guttering for the longer runs here (a two-week delay). For all that time, we're entering the building via the back door.

This shows raw wood guttering milled precisely to the original profile, treated chemically for longevity, glued into a complex form that fits between the gables. This narrow channel has to receive runoff from two roofs, so it's easy to imagine it being overrun in a downpour. Note the authentic metal endplate that sits just shy of the bargeboard.

The Savage bungalow is built on a hilltop directly on rocky outcrops, so erecting scaffolding in this situation is tricky business. Hefting tools, and the human body, up to the platform is also challenging. Vern solved these problems by building a small electric lift (you can just see the yellow motor showing at the back of the scaffold - sheer genius!).

Lift and scaffold allow Vern to have a stable power saw for angled cuts ready to hand. This saves time and effort going up and down in order to work on the pieces, which are numerous.

Shortly after I discovered the soffit problem, a large woodpecker landed on this battered stone pier and began hacking at one of the three posts supporting the porch roof. The ease with which it opened it up indicated more rot, which Vern confirmed before patching the holes (you can just make out the three white patches). He checked all the posts and determined they were solid enough to continue supporting the roof - but only if they didn't rot any further.
Rot is always attributable to moisture (Dry rot). In this case, the concrete caps on the piers often get wet when it rains, allowing moisture to wick up along the wood grain in the posts, causing rot over time. Vern's solution was elegant: slip a square of asphalt shingle under each post, as a barrier to moisture wicking up the grain of the wood. He's using a five-tonne jack to inch the roof up just enough to slide the shingle under the posts.

All the repairing is finally done, a testament to Vern Krahn's skills and our combined close attention to details. In a bungalow of architectural value (which is a great many), the proportioning and fine details count. The devil lies in getting them right, no matter whether they're inside or out. It takes a lot of careful looking - and analyzing - to catalogue what you have before embarking on restoration. It's all part of paying attention to the bungalow entrusted to you.
I'm excited to see what ours will look like when we finally do get to painting it. With a centennial to celebrate in 2013, we want our bungalow looking its very best - not by any means brand new, but well-tended. I'll be very satisfied if it looks as though no one did anything except take care of what was always there. At least, that's what I'm aiming for: interventions that are ultimately undiscernible to anyone looking at the building.
Books for looks: Powell and Svendsen's Bungalow Details: Exterior is an inspiring read for owners embarking on restoration. Robert Winter's California Bungalow unpacks the design philosophies embedded in classic bungalows, which helps us understand our building and interpret the meaning of the details.
"Good restoration is a series of modest projects done well; more history was destroyed by spending too much money than by not enough." Erik Hansen